Showing posts with label Design. Show all posts

Wednesday, July 1, 2015

June/ July Chair Build


Well as Brian has said many a time, "Life happens".  Such is the case with me.  I did manage to get a chance to finish carving the spindles for my chair last Saturday.  Before I did that I took a few minutes to sharpen my drawknives.  While the edges felt sharp and would grab a finger nail, I could tell by the way they were cutting it was time for a quick tune-up.

Bevel down knife and the Drawsharp
Pete Galbert in conjunction with Jameel Abraham of Benchcrafted fame, developed the Drawsharp.  It is a wonderful tool for quickly sharpening/honing the edge of a drawknife.  Check it out here on the Benchcrafted site and on Pete's blog.

I was able to get the spindles roughed out into octagonal shapes and set aside to begin to dry.  I let them sit for a bit before exposing them to the heat in the attic, my present day kiln that only works in the summer months.  This keeps the pieces from warping and splitting.  I was curious so tonight I checked an extra spindles moisture content and was happy to see it had gone form 35% to 15% since Saturday.  Now I cam put them in the attic to begin super drying them.


Spindle at 15% EMC.  Time to put in the attic.

I finished the night off by doing a bit of redesigning of a stool seat.  What I did was increase the size by 10% and changed a few sight line, rake and splay angles.  Nothing drastic from the original design, but it is something that I have been wanting to do and now that I have someone wanting a stool I have the opportunity.

In shop design session.

Next I will be finishing up the arm for the chair and preparing to do the final assembly.  Hopefully the sun will come out and heat up the attic so that I may finish up the June Chair Build by the end of next week.  If not I may just have to finally break down and build a kiln.  Until the next time be well and be safe.

~ Ray Schwanenberger

Tuesday, June 2, 2015

June Chair Build

It is June 2nd and time to participate in the June Chair Build that has been promoted by Brian Eve. In case you are not familiar with our host allow me to give you a glimpse.  Brian is a woodworker who is living in Munich Germany and the author of the blog Toolerable.  Brian arrived in Germany in the 1990's while he was in the US Army.  Brian spent eight years in Bamberg Germany and a year deployed in Iraq.  After Brian's discharge from the Army he moved with his wife to Munich, where he is employed as an Army civilian.

Brian started woodworking at the Army woodshop building furniture for his barracks room.  Things like bookshelves, coffee table and blanket chest.   When he arrived in Munich, space was at a premium and it appeared there was no room for a woodshop.  Or was there?  Brian figured if he used only hand tools  he would be able to carve out 100 square feet of space in the basement storage area and have his shop.  Check out this short video of his tiny workspace here.  When Brian has to use machinery he uses the machines at the Dictum GmbH shop or the Army woodshop in Garmisch.

Brian says he especially likes building tools for the challenge and in the end you have a useful tool. Brian also likes blogging because it helps him to think through a project when he can't be in his shop. He also likes the camaraderie of the internet woodworking universe.  Thank you Brian for sharing your story with us.

I will be making a series of post on the chair that I am building and the experiences along the way.  I will be building, of course, a Windsor Chair.  This will be a child's Sack Back Windsor.  A while back a friend was soliciting donations to raise money for a mission trip to Africa.  I donated a certificate for a child's Sack Back, this is the chair that I will be building.

My lovely chair model Chloe


Unlike the chair in the photo above, I will be turning bamboo turnings for the undercarriage and the arm posts. These will be turned in maple.  The spindles, arm and bow will be made from white oak, and the seat will be carved out of sugar pine.

The maple rounds have been drying for a year or two and should be quite stable.  The sugar pine I purchased when Midwest Woodworking in Cincinnati Ohio went out of business.  I was told it had been drying for over 30 years, so it should be quite stable as well.  The white oak is in the form of a large log that has been drying next to my house for a bit over a year.  This gives me reason to pause. While I have used one section of the log to date the other unsplit section has been sitting longer than I would have liked.

Midwest Woodworking stacked wood
After splitting the log open I will take a moisture reading and see where I stand.  If the reading is below 25% I will be afforded the "opportunity" to experiment with soaking the rivings prior to shaping and bending the arm and bow.  Pete Galbert addresses working with air-dried wood in his book Chairmaker's Notebook on pages 146-147. If the moisture content is 25% or above I will make the parts without soaking them.

The only other thing/obstacle to slow me down is me.  I had to have a procedure preformed on my Achilles Tendon yesterday morning and I am to take it easy for the next couple of weeks.  While carving at the shavehorse fits the bill I'm not sure about splitting that big oak up.  In light of this situation I will be doing things a bit out of order from my normal process.


For all that are joining in on the chair build good luck and straight grain to you all.


~ Ray Schwanenberger

Monday, January 27, 2014

Shop Stool Build Off - The Conclusion


It is the day after the Shop Stool Build Off (SSBO) and what a great time it was.  So many people working across the world on a single project, a new shop stool.  One would think this would be a fairly simple thing to build.  Many of us used this opportunity to push our talents to the next level.


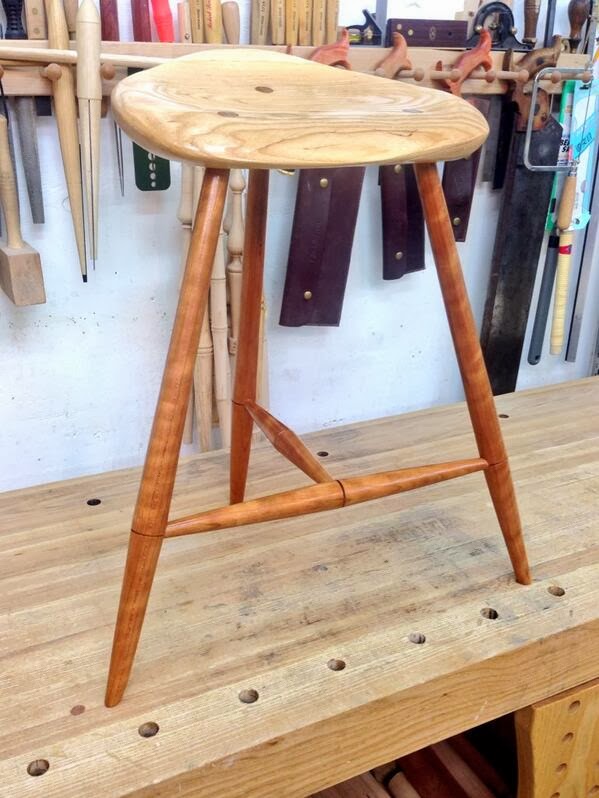
At the center of my design is a seat that tilts 10 degrees forward to promote a more ergonomical sitting posture.  The three legged design provides a solid base no matter how uneven the surface it sits upon.  I chose contrasting colors for the stool.  The seat is Ash and the legs and stretchers are Cherry.

I started Saturday morning laying out the seat on a piece of 8/4 Ash and then boring the mortises for the legs.  This is where great concentration was required.  The front legs raked (angle as seen from the side) 19 degrees and splayed (angle seen from the front/rear) 17 degrees as legs normally would.  The single back leg is counterintuitive because of its 1 degree rake toward the front of the seat and 0 degree splay.  This is what is needed to give the seat its 10 degree forward tilt.


After boring the mortises I moved onto sculpting the seat.  This was my second workout for the day.  The first was shoveling out the driveway and the pile of snow the plow left behind.  There is a reason that Eastern White Pine (EWP) is used almost exclusively in the making of Windsor Chairs.  Ash is hard!  What was I thinking, there is a reason they make baseball bats out of Ash.


To change things up I moved onto turning the legs and stretchers.  All was going well until the last leg. It was then that a hidden knot revealed itself.  My fix was to fill the cavity with epoxy and continue turning.  The leg came apart on the lathe.  This meant a design change was in order.   The only way to save the project was to shorten the legs resulting in a stool that is now 21 1/2" tall.

At this point it was late and I was hungry and a bit dejected at this unwelcome development.  So I called it a night deciding to start fresh in the morning.


Sunday morning started with me referring back to my trigonometry tables.  I had to determine the correct leg lengths to maintain my required 10 degree forward tilt of the seat.  After I had determined the correct length of the legs I moved onto reaming the mortises to a 6 degree taper.  In my opinion this is one of the most critical steps in the process.  To have the undercarriage symmetrical I had to be spot on with my reaming.  Here you can see the 1 degree forward rake of the rear leg.


 In the picture below it appears there is one leg when in fact there are two.  This indicates that the extra time and care taken during reaming has paid off.


Things at this point are looking symmetrical.


Next was to measure, turn and fit the stretchers.  After that was the somewhat nerve racking glue up.  First step is to glue up the undercarriage.  If everything was done with care and great attention paid to the details the seat should slide on without much effort.


All that was needed was the usual slight pull on the tapered tenon leg tops and into the mortises they slid.  Next was installing the wedges perpendicular to the grain of the seat.


After a couple of hours the glue had dried and the tenons and wedges were trimmed flush to the seat.  I then scrapped and sanded the seat.  All that was left was to apply the finish.  First was a seal coat of dewaxed shellac.  This was followed by two coats of an oil/varnish mix.  After it had dried I rubbed it out with a gray nylon pad and applied one coat of General Finishes Polycrylic to give it the tough protection it will need.


I have to tell you this was a roller coaster of a ride.  But once the stool was completed and sitting there it became evident that it was one heck of a good time.  Like a roller coaster, I will quickly get in line to participate in another Build Off.  Many thanks to Chris Wong of Flair Woodworks for putting on the SSBO.  I hope I will see you at the next one, whatever it may be.
~ Ray Schwanenberger

Friday, January 24, 2014

Shop Stool Build Off - 2

Tomorrow the Shop Stool Build Off (SSBO) begins.  Chris of Flair Woodworks fame and creator of the event, has posted a list of participants in this weekends SSBO.  You can see who is participating here.  At this time I am still not sure if I will be able to participate.  However, I have been preparing incase it all works out.


My influences for the stool, as I mentioned before, are from a design by Pete Galbert, Curtis Buchannan, and Galen Cranz, that Pete calls "The Perch".  The Perch has the single leg in front and I am moving it to the back, ala Wharton Esherick.  I happened across a photo of a three legged stool by Mr. Esherick and was captivated.


As my mind raced most of the night on different leg designs, I have decided to stay with what I know.  That is the round, tapered through tenoned leg with stretchers.  Now I am toying with a bit of a change to the stretchers but I may not have the time to be able to do what I call a "Wishbone Stretcher".  That would require steam bending and there is just not enough time to get it to dry properly.

Another one of my influences for the build is Leonardo da Vinci and his Vitruvian Man.  This all has to do with human proportions.  I want to be able to adapt any stool for any person and use that individuals height to do so.  Wow the brain synapses are firing now.


That being said I have a few more ergonomic details to work out for a person of my height at 6' 0".

I hope it all works out and I am able to be posting results tomorrow.  Good luck to all.

~Ray Schwanenberger

Monday, April 29, 2013

Projects In The Works

I heard from a friend the other day wondering if I was still blogging about my chair making and woodworking.  Yes I am, but obviously I am not doing a very good job of it.  I get so involved in the project at hand that I totally space out on making posts about it.  So this is to catch-up on what I have been doing.


My wife and I agreed we wanted to try a different color milk paint on the Continuous Arm Windsor.  This also afforded me the opportunity to try General Finishes Milk Paint for the first time.  I am doing a two color painting, still going for a mottled look, similar to the black over red I have used on my other chairs.  The first coat, pictured above, is Federal Blue.  This will be covered with a darker Coastal Blue wash coat.  Because I am using two shades of blue, I doubt the mottled appearance will be as dramatic as the black over red.  I will post more pictures in my next post (it won't be in a month I promise) along with my thoughts on the GF milk paint. 


One of the projects on my "Honey-Do-List" is a proper bed frame for our new Sleep Number Bed.  The material is from an Ash tree that had been blown over when a tropical storm had come through our area a few years back.  The tree yielded just shy of 1000 bd. ft. of beautiful material.  This tree has provided the material for my bench, shave horse, a Welsh Stick Chair and now the king size bed and two night stands, yet to be started.  It will be interesting to see just how much furniture I will be able to make from just this one tree.


The two pictures above are the dry fitting and glue-up of the head and foot board.  I did not have material wide enough for the panels so I re-sawed the material then did the glue up.  I wanted to have an interesting, but not overwhelming, flow of the grain pattern from one panel to the next.

The glue up is almost complete.  All that is left to do is install the top boards and prep the side boards for hardware.  Then I will do one last dry fit/assembly to ensure everything is copacetic before applying the finish.  By the way Ash is a heavy wood and it is going to be an adventure getting this headboard upstairs.  Ready the ibuprofen! 

~ Ray Schwanenberger

Tuesday, October 2, 2012

Sizing A Chair

Recently I have experienced some neural oscillations about sizing chairs based on the users body dimensions.  I recall reading an article, a few years ago, by Jim Tolpin in which he stated; "The human frame can be roughly proportioned in whole-number ratios of eight".  The theory is this; By dividing the distance of ones hand span into eighths (8:8 ratio), you will then be able determine any dimension needed to design furniture to fit the user.  This led me to do a little research on Leonardo Da Vinci's Vitruvian Man and the proportions of the human form.  From this information one can derive that we are as tall as we are wide with outstretched arms.  Which by the way is equal to eight hand spans (64:8).  Our shoulder span is equal to two hand spans (16:8), our forearm (wrist to inside of elbow) is equal to one hand span (8:8), and the length of the lower leg (floor to middle of the knee) is a ratio of 18:8.  I know what you are thinking.  Very few people fall into the Vitruvian Man "ideal" category.  This is true and most of these proportions will not be exact but should be close enough to use in the design of a chair or any furniture for that matter.


Well, I had to put what I had learned to the test.  I got in touch with my good friend Dean and asked him to measure his hand span.  Yeah I didn't really think it through or look at the time before I initiated the conversation!  After a few questions about my activities that evening, he reluctantly took the measurement and advised me that the measurement was 8.75 inches.  I then asked him if the span of his shoulders was 17.5 inches.  This is when he accused me of drinking to excess and politely cut the conversation short.  Knowing Dean as I do, I knew this would eat at him until he would take the measurement to satisfy his curiosity.  I also knew that I would soon hear from Dean.  As suspected, he did take the measurement and confirmed my calculation, and was still of the opinion that I was drunk.

It is my hope that I will be able to use these whole-number proportions and the clients hand span dimension to design a chair that will fit the client for its intended task.  I especially want to employee this method with my guitar chair that is still in the designing/prototype stages.  Over the next several months I will be building and testing some prototypes using only this method.  If this proves to be successful, imagine how easy it would be to custom build a specialized chair for someone on the other side of the country.

I would deduce that the chair below belongs to someone with rather big hands, and you know what "they" say about big hands.  Big Chair?