Monday, January 27, 2014

Shop Stool Build Off - The Conclusion


It is the day after the Shop Stool Build Off (SSBO) and what a great time it was.  So many people working across the world on a single project, a new shop stool.  One would think this would be a fairly simple thing to build.  Many of us used this opportunity to push our talents to the next level.


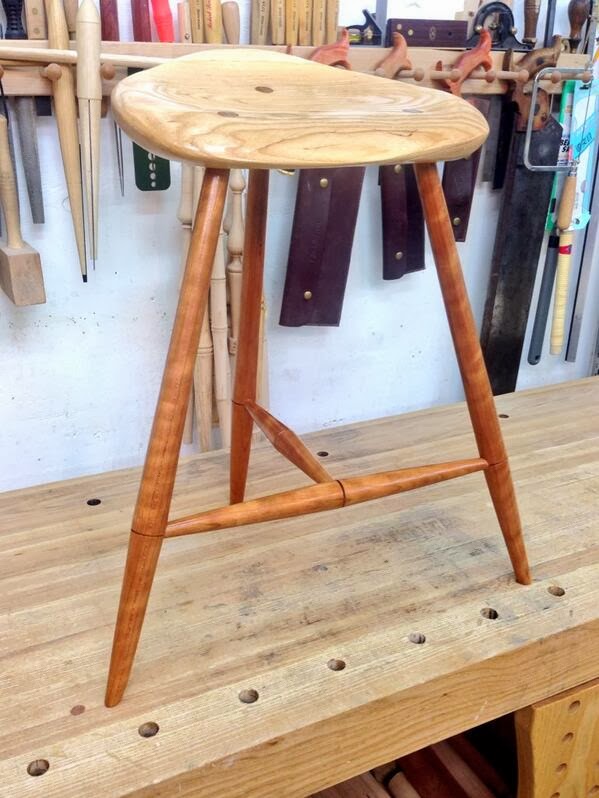
At the center of my design is a seat that tilts 10 degrees forward to promote a more ergonomical sitting posture.  The three legged design provides a solid base no matter how uneven the surface it sits upon.  I chose contrasting colors for the stool.  The seat is Ash and the legs and stretchers are Cherry.

I started Saturday morning laying out the seat on a piece of 8/4 Ash and then boring the mortises for the legs.  This is where great concentration was required.  The front legs raked (angle as seen from the side) 19 degrees and splayed (angle seen from the front/rear) 17 degrees as legs normally would.  The single back leg is counterintuitive because of its 1 degree rake toward the front of the seat and 0 degree splay.  This is what is needed to give the seat its 10 degree forward tilt.


After boring the mortises I moved onto sculpting the seat.  This was my second workout for the day.  The first was shoveling out the driveway and the pile of snow the plow left behind.  There is a reason that Eastern White Pine (EWP) is used almost exclusively in the making of Windsor Chairs.  Ash is hard!  What was I thinking, there is a reason they make baseball bats out of Ash.


To change things up I moved onto turning the legs and stretchers.  All was going well until the last leg. It was then that a hidden knot revealed itself.  My fix was to fill the cavity with epoxy and continue turning.  The leg came apart on the lathe.  This meant a design change was in order.   The only way to save the project was to shorten the legs resulting in a stool that is now 21 1/2" tall.

At this point it was late and I was hungry and a bit dejected at this unwelcome development.  So I called it a night deciding to start fresh in the morning.


Sunday morning started with me referring back to my trigonometry tables.  I had to determine the correct leg lengths to maintain my required 10 degree forward tilt of the seat.  After I had determined the correct length of the legs I moved onto reaming the mortises to a 6 degree taper.  In my opinion this is one of the most critical steps in the process.  To have the undercarriage symmetrical I had to be spot on with my reaming.  Here you can see the 1 degree forward rake of the rear leg.


 In the picture below it appears there is one leg when in fact there are two.  This indicates that the extra time and care taken during reaming has paid off.


Things at this point are looking symmetrical.


Next was to measure, turn and fit the stretchers.  After that was the somewhat nerve racking glue up.  First step is to glue up the undercarriage.  If everything was done with care and great attention paid to the details the seat should slide on without much effort.


All that was needed was the usual slight pull on the tapered tenon leg tops and into the mortises they slid.  Next was installing the wedges perpendicular to the grain of the seat.


After a couple of hours the glue had dried and the tenons and wedges were trimmed flush to the seat.  I then scrapped and sanded the seat.  All that was left was to apply the finish.  First was a seal coat of dewaxed shellac.  This was followed by two coats of an oil/varnish mix.  After it had dried I rubbed it out with a gray nylon pad and applied one coat of General Finishes Polycrylic to give it the tough protection it will need.


I have to tell you this was a roller coaster of a ride.  But once the stool was completed and sitting there it became evident that it was one heck of a good time.  Like a roller coaster, I will quickly get in line to participate in another Build Off.  Many thanks to Chris Wong of Flair Woodworks for putting on the SSBO.  I hope I will see you at the next one, whatever it may be.
~ Ray Schwanenberger

Friday, January 24, 2014

Shop Stool Build Off - 2

Tomorrow the Shop Stool Build Off (SSBO) begins.  Chris of Flair Woodworks fame and creator of the event, has posted a list of participants in this weekends SSBO.  You can see who is participating here.  At this time I am still not sure if I will be able to participate.  However, I have been preparing incase it all works out.


My influences for the stool, as I mentioned before, are from a design by Pete Galbert, Curtis Buchannan, and Galen Cranz, that Pete calls "The Perch".  The Perch has the single leg in front and I am moving it to the back, ala Wharton Esherick.  I happened across a photo of a three legged stool by Mr. Esherick and was captivated.


As my mind raced most of the night on different leg designs, I have decided to stay with what I know.  That is the round, tapered through tenoned leg with stretchers.  Now I am toying with a bit of a change to the stretchers but I may not have the time to be able to do what I call a "Wishbone Stretcher".  That would require steam bending and there is just not enough time to get it to dry properly.

Another one of my influences for the build is Leonardo da Vinci and his Vitruvian Man.  This all has to do with human proportions.  I want to be able to adapt any stool for any person and use that individuals height to do so.  Wow the brain synapses are firing now.


That being said I have a few more ergonomic details to work out for a person of my height at 6' 0".

I hope it all works out and I am able to be posting results tomorrow.  Good luck to all.

~Ray Schwanenberger

Tuesday, January 21, 2014

Shop Stool Build Off

This Saturday, January 25th, is the Shop Stool Build Off.  What is this you ask?  It is an event conceived by Canadian woodworker Chris Wong where woodworkers around the world are invited to build their best shop stool in a day, or weekend if Sunday is needed.  The progress will be tracked via Twitter #SSBO, Google+, Facebook, etc.  At the conclusion Chris will share pictures of all of the pieces on his blog.  This sounds like a good time and the details can be seen on Chris's web site.

I will be building a stool in the Windsor style, of course.  Though I must confess, it is not an original design, but that is the beauty of this event; It doesn't need to be.  It is my addaptation of an ergonomic stool designed by Pete Galbert, Curtis Buchannan, and Galen Cranz, that Pete dubbed "The Perch".

It is no secret that I have been experimenting with chairs for guitar players.  The more I worked with my prototype the more design questions and challenges have been brought to the surface.  I have been looking to solve some of these questions with a more simple stool for guitar players.  With that being said, my plan is to make a dual purpose prototype "Studio/Shop Stool".  I look forward to seeing all the stools made during the event, and hope you too will be participating.  


~ Ray Schwanenberger

Friday, January 17, 2014

Drawknife Rehab - The Conclusion

It has taken a bit longer than expected, as usual, to complete the rehab.  However, after a few minor bumps in the road, it is done!  In the last episode I left off needing to hone an edge on the newly ground bevel.  So with great anticipation I went to the drawer that holds my new Galbert Drawsharp.  Are you are asking yourself; "What is this new fangled contraption of which he speaks"?


It is a wonderful tool for sharpening/honing drawknives.  It is the brain child of Chairmaker, instructor, raiser of goats and all around nice guy, Peter Galbert in collaboration with tool maker, artisan and all around nice guy Jamel Abraham of Benchcrafted.  Ok enough of the Bromance.  Check out the Drawsharp here.


Following the instructions I set the Drawsharp to hone the newly ground edge.  I started by making several passes with the diamond abrasive on the beveled edge until a burr was turned along the entire edge.  I then flipped the drawknife over and honed the back turning the burr back to the bevel side.  This left me with an even scratch pattern along both sides of the edge.


When using the Drawsharp you hold the drawknife as though it were a fiddle and move it over the blade.  Next, I turned the pads to the sandpaper sides and continued to turn the burr from bevel to back and back to bevel using a diminishing number of strokes until the burr had disappeared.


I have heard it said many a time, if a drawknife can cut Eastern White Pine end grain and leave it silky smooth, it is truly sharp.  Well, I am short on EWP.  However, I have a plenty of Sugar Pine.  Sugar Pine is a bit harder and more dense than EWP, but only slightly.  So without any handles I put the edge to the pine.  Not the results I was hoping for.


As you can see the cut bore evidence of fine nicks in the edge.  I retrieved my jewelers loop to closely inspect the edge.  As I feared and suspected, the pitting on the back was not going to allow me to produce a keen edge.


This meant one of two things, either scrap the project here and now or attempt to remove the pitting from the back.  I don't know about you, but at times like these I hear voices; in an English accent I hear "What the bloody hell, get to work".  It might be a dead relative?  So it was, I took a file and worked the back of the drawknife, taking care to keep it as flat as humanly possible.  After removing about 1/4" to 3/8" of the pitting back from the edge I put the drawknife to a series of water stones stopping at 8000 grit.


 I repeated the honing process with the drawsharp and the final results were this.


As you can see there is still evidence of a tiny nick caused by the pitting.  I looked with the loop again and found it to be close to the end of the blade.  It was a go for the handles.  I thought about using paduck or purple heart but decided on good old cherry.  Why?  J.W. Mix & Co. was the maker of the drawknife and my research revealed the company was in New Haven, CT.  I felt it was only fitting to use a beautiful American hardwood on this old American drawknife.  I remembered my brother-in-law giving me some old cherry sticks that he salvaged out of a 19th century home, so I went digging.


This was my step drilling gauge for each handle and the handle pattern.  Each handle needed to be step drilled to accommodate the handle tangs that transition from rectilinear to round.


Now let it be known far and wide, I am not a woodturner.  I would someday like to be very proficient, that being said, this process took me probably three times as long as someone who knows what the heck they are doing would have taken.  Whew, that felt good to get that off my chest.  First I roughed out the cylinders then I step drilled each one.


Next I put the blanks between centers and began shaping the handles.  This process was much like turning legs for chairs, only smaller.  I was feeling my oats and thought I would use a skew chisel to give it that extra nice touch.


As you can see, I was humbled and put the skew away for yet another day.


Here are the finished handles drying.  The three dark rings were scribed with a skew and then burnt in with an old guitar G-String.  The finish is shellac put on while spinning on the lathe, then burnished with shavings.  After that, I wiped on several coats of an oil varnish mix.  The only thing left was to put the handles on the drawknife.


First I annealed the tang ends by heating them to a cherry red and letting them cool.  This made it easy to peen them over.  Thanks for the heads up Pete.  I really, really like the look of natural cherry and black together so I decided to paint the ferrule's and caps black.


A drawknife that could have easily been destined to be on the wall at a Cracker Barrel will now be residing on the wall above my bench waiting to be put into service.


With every project I try to learn something.  I take away from this project; The importance of finding edge tools that are free of or have very little pitting; That some tools are worth the extra effort to make them usable again; That investing my money in good tools made by good people is worth 10 fold the expenditure; That investing some time in learning to use a skew chisel would be a wise investment.

I hope that I have been able to provide you with some good information.  Information that will encourage you to get into your shop and try something new.  This is how we learn, by pushing ourselves outside of our comfort zone.  So let's go to the shop and do something new and exciting, and always be safe.

~ Ray Schwanenberger

Sunday, January 5, 2014

Drawknife Rehab - Part 4


Yesterday my day began a little before sunrise with a trip to my good friend Ralph's farm in the flat lands of eastern Indiana to pick up a little hard maple.  It was a beautiful drive with the fresh snow on everything and as the sun came up revealing a crystal blue sky.  After I got a close look at the pieces I think I may have some figured maple on my hands.  These are not ideal for leg blanks for my windsor chairs but I think I will be able to use them for another project.  That of course will be another post.

After an equally beautiful trip home I parked the truck and headed into the shop.  It was time to get back to rehabbing my old drawknife.  This next step, grinding the blade to remove the chip/nick, was the one that was going to determine if this was the end of the trail for this project or if I was going to be able to continue and make this a usable drawknife.


I had several concerns moving forward.  The one concern that loomed greatly in the back of my mind was a matter I had never considered or heard of, until Paul Frederick brought it to my attention in a comment. Hydrogen Embrittlement.  My understanding of hydrogen embrittlement is that atoms of hydrogen are absorbed into the steels atomic lattice like structure which causes the steel to become brittle.  Hydrogen embrittlement may have occurred to some extent because I removed the rust using electrolysis.

Michael Olsen is an electrical engineer that read the post and left this comment:  "I would be skeptical of embrittlement considering the relatively low energy levels used.  Most such brittleness occurs in either high voltage electrolysis of thicker material or combined low voltage and thin sheeting".  Michael gave a very interesting and more in depth explanation in his comment that helped put my mind at ease.

Further research revealed that the passage of time, letting the piece sit for an undetermined amount of time, or baking the piece at 200 degrees Celsius (392 degrees F) for four hours, would cause the hydrogen to be dislodged from the steel.  Since the knife sat over the Holidays it was off to the grinder.


In the picture above is the jig I use for grinding drawknives.  This jig is one that came from the wonderful mind of Pete Galbert.  If you are interested in building this wonderful jig and learn how to use it check it out here.  There is no need for me to try to explain what Pete has already done so well.  The first thing I had to do was to prep the spine of the drawknife.  I filed, sanded, and waxed the spine to ensure that it would slide easily over the hardened steel pins of the jig.  As a side note, since I do not have a designated spot in my small shop to work on metal, I take great care to shop vac, often, the metal filings so that I do not discover them in a future woodworking project.


After preparing the spine I adjusted the jig so that the wheel would be grinding in the middle of the existing bevel.  I measured this to be roughly 25 degrees.  I used no real forward pressure on the knife just enough to keep it in contact with the stone without jumping, and moved the knife back and forth across the spinning stone.  I do use a slow speed grinder.  While I was making progress it was taking quite a long time to get down to the bottom of the chip/nick.  So I decided to employ a method I have used on nicked plane irons in the past.


I used a set of dividers to gauge the distance from the spine to just at the bottom of the nick and scribed a line onto the newly ground bevel.  I then marked the metal that was to be removed with a red Sharpie.  Here is where the process goes against everything that seems correct.  I laid the flat back of the knife onto a grinder table and ground the edge of the knife to the scribe mark.  Zip-A-Dee-Do-Dah and Bob's your uncle, no more chip/nick.  Now what remained was a relatively large flat where a sharp edge is supposed to be.  I highlighted it in red so it would be easier to see.  Now it was back to grinding using the grinding jig.


With a little more time I was able to grind a nice even bevel across the knife and it is now ready for honing.  I was so excited to be able to reach this point of the restoration without the drawknife cracking due to possible hydrogen embrittlement and to discover, at least at this point, it appears the pitting that remains is not deep enough to prevent me from obtaining a good edge.  However, this will only be fully realized when I finish honing.  I was so pumped up over the results I broke out all of my old drawknives that needed to have the bevels reground and went to work.  In a matter of thirty minutes I was done.


The next thing that needed to be done was to make the angle of the handle tangs as close as possible to the same in a position that was comfortable to me.  It turned out to be just about 83 degrees.  I was able to accomplish this very easily without heating the steel.  I clamped the tang up to the bend in my leg vise and ever so gently moved the blade to obtain the desired angle.  I then ensured that the tangs were in line with the back of the blade.


What determines if a drawknife is bevel up or bevel down?  If the handles are in line with the back of the spine it is a bevel down knife.  When in use with the bevel down the hands and wrists will be comfortably in a downward position.  It is not very comfortable, nor is it recommended, to use a drawknife with the wrists cocked upward in an unnatural position.  By laying the knife on its back and then on its bevel, it readily becomes evident as to which way the drawknife is to be used.


In the next exciting episode of Drawknife Rehab, I will be posting on honing the edge, starring the amazing Galbert Drawsharp. If all goes as planned, I will be including the turning and installation of the handles.  So stay tuned for the next exciting episode of Drawknife Rehab.  Yeah I know, my bubble is a bit off.

~ Ray Schwanenberger