Friday, June 5, 2015

Chair Build Day 1

Well as you might imagine getting around in the shop with a large medical boot brace on ones foot is cumbersome.  However, I must press on.  Usually I would split, rive and shave my arm and bow parts first. Followed by a good steaming then bending them in their appropriate forms and setting them aside to dry.  Then I would move onto the other greenwood work, the spindles.  But as I said in a previous post I am going to be doing things a bit out of order, due to my aforementioned state of gimpiness.  I am attempting to recruit a strong young person to split that big ole oak log for me.  So far no luck.

So I started on the seat blank.  I laid it out, drilled my center spindle hole and the four leg holes.  I then began to carve the bowl of the seat.  I am happy to report that the Sugar Pine carves very nicely. Like its cousin Eastern White Pine it requires sharp tools.  I started with my adze made by Tim Manney.  It works so nicely and made very short work of removing the bulk of the seat bowl.  I am a novice with this type of adze and am still learning the nuances of the tool.  Next I moved onto the scorp/inshave. Taking a skewed cut working downhill while paying close attention to the grain is paramount.  The wood will let you know how it wants to be carved.  It is very important to heed its warnings so as to avoid tearing out a deep hole that will be difficult to remove.  The last step was to move to my travisher made by Claire Minihan.  The travisher is a bit of a peculiar tool to learn to use, for me at least it felt a bit counter intuitive.  Again I used a skewed cut working downhill paying attention to what the wood would allow me to do.  Using my bandsaw I cut out the front of the seat in preparation to carve it.

Tools Left to Right: Adze, Travisher, Scorp/Inshave

Next I drilled the arm post holes.  To do this I used a square, bevel square and mirror to obtain my 17 degree angle along the sight line.  The mirror allows me to compare my drill bit to the bevel square with a glance rather than having to move my head around causing me to loose alignment with the sight line. I use a square lined up perpendicular to the sightline to help me stay aligned as close as possible to the sightline.


After drilling both arm post holes I turned the bamboo style arm posts on the lathe.  I do this before reaming because I want to assign and fit an arm post to a particular mortise during the reaming process.  The arm post will be marked for its particular mortise and that is where it will reside for the remainder of its days.

Bamboo Style Arm Post
   
Next I ream the arm post holes and make them into tapered mortises.  As when drilling, I use a square, bevel square and mirror when reaming.  My reamer has a 6 degree included angle, therefore I set the angle to 14 degrees, three degrees less than the 17 degrees used to drill the holes.  I align the blade of the square with the sightline and compare the top tip of the reamer with the blade of the square.  If it lines up with the edge of the blade, I'm spot on.  If the tip is left I must take more off the right side of the mortise and vise versa if the tip is right.

Reamer is in line with the sightline
 
Next I brought the bevel square up to the reamer and observed the gap between the blade of the bevel square and the tapered surface of the reamer.  If the gap is the same up and down the reamer, I'm spot on.  If the gap is larger at the top I need to take more off the mortise toward the square and vise versa if the gap is larger at the bottom.

Reamer is at the correct angle

So after reaming both mortises to the indicated correct angles one might think that it is a completed task.  Oh contraire!  What I have neglected to explain is that I actually don't ream the mortises to their final depth until after I check to see that both arm posts are in the same plane.  I feel this is one of the most critical stages of building an armchair.  If the arm posts are not in the same plane it will make it hard to get the arm to sit correctly at a later stage in the process.

Winding Sticks to check the plane of the arm posts

Even though everything appeared to be correct, a pair of winding sticks would let me know just how close or far off  I was.  At first check I was off a wee bit and it was close enough that a very minor adjustment, a half turn of the reamer to the left arm post mortise, was all it took to be nuts on.

The gap at the left is ever so slightly larger than at the right.  When the gap is even everything is copasetic.
Well that was all my foot could handle for the day.  Next I will be turning the legs and stretchers for the undercarriage.  All the while I will be attempting to recruit some help with getting that oak split.  

~ Ray Schwanenberger
Thursday, June 4, 2015

Pirated Plans

I have just been made aware that Curtis Buchanan's plans for his Comb Back Windsor Chair have been pirated and put up for sale on a scam website.  The scammer/thief who's name is Ted "Woody" McGrath has taken it upon himself to copy and sell Curtis's plans without his permission.  When I went to the scam site it is clear that these are in fact Curtis's plans.  Curtis's name and the copyright are clearly visible.  You can call it scamming or piracy, but let us call it what it is; STEALING!  I HATE A THIEF!  Apparently ole Woody has been called out before.

Curtis has taken the time and put forth the effort and money, along with the help of others, to share his years of knowledge.  He has done this with an absolutely wonderful series of free instructional videos on his web site and YouTube.  On his site Curtis has an online store where he offers his plans and a video series on DVD.

Curtis is one of the most genuinely giving people I have ever met and had the pleasure to call my friend.  I believe in and practice supporting people that are willing to freely give of themselves while trying to carve out a living in the world of woodworking.  You may say, "Why would you pay for something if it is free online?"  In no way can you have the experience that an in shop class with Curtis provides with an online video.  For example, some of the conversations we had during our time together in his shop gave me insight into different ways to go about my chair building.  There is no way to put a price on that and that is something I would never get from a video.  

I will continue to support Curtis by buying his plans as they become available.  Could I make a chair without them, yes!  But to me that is not the point.  If you feel as I do, I urge you to put the word out about this thief.  If you ever considered taking a class to learn to build a Windsor Chair, do yourself a favor and contact Curtis.  I guarantee he will not disappoint.

~ Ray Schwanenberger

Tuesday, June 2, 2015

June Chair Build

It is June 2nd and time to participate in the June Chair Build that has been promoted by Brian Eve. In case you are not familiar with our host allow me to give you a glimpse.  Brian is a woodworker who is living in Munich Germany and the author of the blog Toolerable.  Brian arrived in Germany in the 1990's while he was in the US Army.  Brian spent eight years in Bamberg Germany and a year deployed in Iraq.  After Brian's discharge from the Army he moved with his wife to Munich, where he is employed as an Army civilian.

Brian started woodworking at the Army woodshop building furniture for his barracks room.  Things like bookshelves, coffee table and blanket chest.   When he arrived in Munich, space was at a premium and it appeared there was no room for a woodshop.  Or was there?  Brian figured if he used only hand tools  he would be able to carve out 100 square feet of space in the basement storage area and have his shop.  Check out this short video of his tiny workspace here.  When Brian has to use machinery he uses the machines at the Dictum GmbH shop or the Army woodshop in Garmisch.

Brian says he especially likes building tools for the challenge and in the end you have a useful tool. Brian also likes blogging because it helps him to think through a project when he can't be in his shop. He also likes the camaraderie of the internet woodworking universe.  Thank you Brian for sharing your story with us.

I will be making a series of post on the chair that I am building and the experiences along the way.  I will be building, of course, a Windsor Chair.  This will be a child's Sack Back Windsor.  A while back a friend was soliciting donations to raise money for a mission trip to Africa.  I donated a certificate for a child's Sack Back, this is the chair that I will be building.

My lovely chair model Chloe


Unlike the chair in the photo above, I will be turning bamboo turnings for the undercarriage and the arm posts. These will be turned in maple.  The spindles, arm and bow will be made from white oak, and the seat will be carved out of sugar pine.

The maple rounds have been drying for a year or two and should be quite stable.  The sugar pine I purchased when Midwest Woodworking in Cincinnati Ohio went out of business.  I was told it had been drying for over 30 years, so it should be quite stable as well.  The white oak is in the form of a large log that has been drying next to my house for a bit over a year.  This gives me reason to pause. While I have used one section of the log to date the other unsplit section has been sitting longer than I would have liked.

Midwest Woodworking stacked wood
After splitting the log open I will take a moisture reading and see where I stand.  If the reading is below 25% I will be afforded the "opportunity" to experiment with soaking the rivings prior to shaping and bending the arm and bow.  Pete Galbert addresses working with air-dried wood in his book Chairmaker's Notebook on pages 146-147. If the moisture content is 25% or above I will make the parts without soaking them.

The only other thing/obstacle to slow me down is me.  I had to have a procedure preformed on my Achilles Tendon yesterday morning and I am to take it easy for the next couple of weeks.  While carving at the shavehorse fits the bill I'm not sure about splitting that big oak up.  In light of this situation I will be doing things a bit out of order from my normal process.


For all that are joining in on the chair build good luck and straight grain to you all.


~ Ray Schwanenberger

Monday, May 25, 2015

Chairmaker's Notebook - A Must Have

While I have been very busy with my daughters 1920's Bungalow Rehab, I have made time to read Peter Galbert's newly released book Chairmaker's Notebook.  I'm not privy to a word that fully conveys my elation with this book.  For now I will say OUTSTANDING!  BEST EVER!  I know that was two words.


Over the years in my attempt to learn everything I could about how to make Windsor Chairs, I have accumulated eight books about these chairs.  Three were specifically "How To" books, that were a start but left me with more questions than answers.  The other five books are fantastic references on Windsor Chairs, that may be the topic of a different post.  The Chairmaker's Notebook is my ninth and by far the most complete book on the subject.

In addition to writing this wonderful book Pete drew every fantastic illustration.  So what makes this, in my honest opinion, "The Best How To Book On Making Windsor Chairs"?  It is the details. Pete explains in great detail why green wood is used to build these chairs.  How following the grain when making the parts is what gives these chairs their strength.  Also covered is the intricacies of bending wood and drying the wood.  

Pete goes into even greater detail about the tools used in making Windsor Chairs.  How they are to be used, sharpened, and also lets you know what modern day tools can be used in place of the more specific period chairmaking tools.  Pete emphasizes practicing before setting out to make a component for the chair.  Sage advice, take it from a guy who has needed the practice. 

Then there are the details so eloquently and simply put forth on the assembly of the chair, and something that no other book, I have ever seen explain, is the finishing process.  Wow, the time, money and frustration I could have saved.  Then there are the The Appendixes; they cover how the much used sightlines are developed, how to build a shavehorse, and how to grind drill bits that make the process easier.

This high quality book published by the good people at Lost Art Press, leaves no stone unturned when it comes to every detail a person needs to start down the path of being a maker of Windsor Chairs.  If I could have only one book, on how to build Windsor Chairs, this is the book.  

As a side note, this book gives the reader everything needed to build two wonderful chairs however, nothing can match the experience of taking a class with a chairmaker of Pete's caliber.  If you were to combine the knowledge gleaned from the pages of Chairmaker's Notebook with a chairmaking class, you would be light years ahead.  Three people I would suggest taking a class from would be; Of course Peter Galbert in Sterling, MA.; Curtis Buchanan in Jonesborough, TN.  I have found Curtis to be a fantastic teacher and an all around wonderful person.;  Also, Greg Pennington in Hendersonville, TN.  Pete and Greg are cut from the same mold as Curtis.  Greg helped me greatly with my turning skills.

So if you have ever said to yourself, "I wish I could build a chair like that" wait no longer.  Go get your copy of Chairmaker's Notebook and enjoy the ride.
    
~ Ray Schwanenberger

Thursday, April 9, 2015

Where Have I Been Part 2

As I noted nearly a year ago, along with a partner, I started a Radon Testing and Mitigation company.  After many hard months it was apparent that there was not the need for another Radon company in our area.  As Kenny Rogers advises (know when to hold em, know when to fold em), I decided to fold em and cut my losses.  This along with the passing of my mother and the untimely passing of a nephew, I have been somewhat of a social recluse.

I have been keeping up with a few of my favorite blogs and watching the work of friends.  I have begun to restore a 1920's bungalow that my eldest daughter purchased.  That should keep me busy for a few months.

What I yearn to do is get back into my shop.  Lost Art Press recently published Chairmaker's Notebook by Peter Galbert.  For me, this was the most anticipated release since LAP opened shop.  I have to tell you it was well worth the wait.  If you have ever thought about building a Windsor Chair this is a must have book.  Pete wrote and illustrated the entire book.  His writing style make the intimidating process of building a chair seem very doable. Today I read a post on Brian Eve's blog, Toolerable about him starting a chair build.  He is encouraging others to join in with their own chair build starting in the month of June.

I have dried seat blanks in stock, dried maple rounds and my choice of two white oak and three ash logs, so why not.  I'm in for a build in June.  I too hope you will venture down this path and get a glimpse of what I have come to enjoy, building chairs.

Stay tuned for photos of the build and watch Brian's wonderful blog also.

~ Ray Schwanenberger

Tuesday, May 27, 2014

Where Have I Been?

It has been exactly 4 months to the day since my last post.  How time flies when you are covered up with the daily workings of getting a business venture off the ground.  I have been retired from my air traffic control career for a little over two years now.  During that time I attempted to turn my passion for chairmaking, and woodworking in general, into a viable business.  There are many pitfalls in trying to make a living as a "Professional Woodworker".  The most difficult being, finding customers that are willing to pay what a handmade piece is worth.

Marc Spagnuolo AKA The Wood Whisperer wrote a wonderful article on this very subject.  So I suggest that anyone considering going down this path go here and check it out.  I will continue to pursue making my furniture and hopefully along the way be able to acquire a few more clients.  I would encourage anyone to follow their dreams, and I will do the same.

So you ask where have I been.  Since February of this year I have been partnered with another local businessman in getting a Radon Testing & Mitigation business off the ground.  This has kept me from my shop, the blog, and most things related to working wood.  Now that much of the preliminary work is done I am hopeful that I will be able to return to the shop, catch up on projects, and keep the blog up to date.

With that being said, I am going to the shop to figure out where to begin.  

~ Ray Schwanenberger

Monday, January 27, 2014

Shop Stool Build Off - The Conclusion


It is the day after the Shop Stool Build Off (SSBO) and what a great time it was.  So many people working across the world on a single project, a new shop stool.  One would think this would be a fairly simple thing to build.  Many of us used this opportunity to push our talents to the next level.


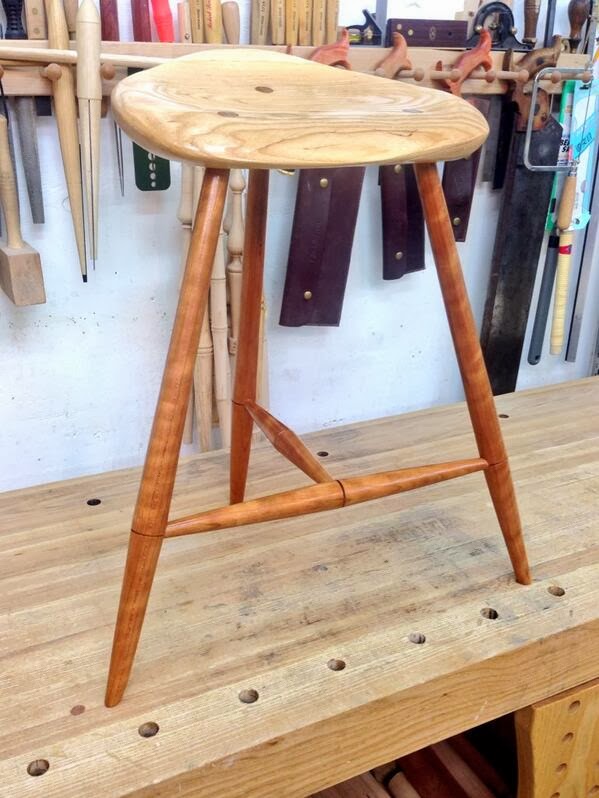
At the center of my design is a seat that tilts 10 degrees forward to promote a more ergonomical sitting posture.  The three legged design provides a solid base no matter how uneven the surface it sits upon.  I chose contrasting colors for the stool.  The seat is Ash and the legs and stretchers are Cherry.

I started Saturday morning laying out the seat on a piece of 8/4 Ash and then boring the mortises for the legs.  This is where great concentration was required.  The front legs raked (angle as seen from the side) 19 degrees and splayed (angle seen from the front/rear) 17 degrees as legs normally would.  The single back leg is counterintuitive because of its 1 degree rake toward the front of the seat and 0 degree splay.  This is what is needed to give the seat its 10 degree forward tilt.


After boring the mortises I moved onto sculpting the seat.  This was my second workout for the day.  The first was shoveling out the driveway and the pile of snow the plow left behind.  There is a reason that Eastern White Pine (EWP) is used almost exclusively in the making of Windsor Chairs.  Ash is hard!  What was I thinking, there is a reason they make baseball bats out of Ash.


To change things up I moved onto turning the legs and stretchers.  All was going well until the last leg. It was then that a hidden knot revealed itself.  My fix was to fill the cavity with epoxy and continue turning.  The leg came apart on the lathe.  This meant a design change was in order.   The only way to save the project was to shorten the legs resulting in a stool that is now 21 1/2" tall.

At this point it was late and I was hungry and a bit dejected at this unwelcome development.  So I called it a night deciding to start fresh in the morning.


Sunday morning started with me referring back to my trigonometry tables.  I had to determine the correct leg lengths to maintain my required 10 degree forward tilt of the seat.  After I had determined the correct length of the legs I moved onto reaming the mortises to a 6 degree taper.  In my opinion this is one of the most critical steps in the process.  To have the undercarriage symmetrical I had to be spot on with my reaming.  Here you can see the 1 degree forward rake of the rear leg.


 In the picture below it appears there is one leg when in fact there are two.  This indicates that the extra time and care taken during reaming has paid off.


Things at this point are looking symmetrical.


Next was to measure, turn and fit the stretchers.  After that was the somewhat nerve racking glue up.  First step is to glue up the undercarriage.  If everything was done with care and great attention paid to the details the seat should slide on without much effort.


All that was needed was the usual slight pull on the tapered tenon leg tops and into the mortises they slid.  Next was installing the wedges perpendicular to the grain of the seat.


After a couple of hours the glue had dried and the tenons and wedges were trimmed flush to the seat.  I then scrapped and sanded the seat.  All that was left was to apply the finish.  First was a seal coat of dewaxed shellac.  This was followed by two coats of an oil/varnish mix.  After it had dried I rubbed it out with a gray nylon pad and applied one coat of General Finishes Polycrylic to give it the tough protection it will need.


I have to tell you this was a roller coaster of a ride.  But once the stool was completed and sitting there it became evident that it was one heck of a good time.  Like a roller coaster, I will quickly get in line to participate in another Build Off.  Many thanks to Chris Wong of Flair Woodworks for putting on the SSBO.  I hope I will see you at the next one, whatever it may be.
~ Ray Schwanenberger